You can upload any file associated with your project and they will be accessible for your team to view and download.


There is a default folder structure which is created for your project as shown here:

You can change this folder structure however, you cannot rename or change the Contributor Forms folder, as completed contributor forms are stored here. Learn more about Contributor Forms:
Contributors
Manage contributor contracts without paper!
Select the folder where you want to upload a file(s) and then click the Upload button.
In the dialog box either drag your files you want to upload, or click to select files from your computer’s file system.
Select the toggle to apply the setting Restrict access to admins and managers to your uploaded files. Files will be displayed with a red icon with a lock if they are restricted (see image above for restricted folders).
Once the files have finished uploading, they will appear in the selected folder.
Select the folder where you want to create a new folder and then click the New Folder button.
In the dialog, enter the name for your new folder.
Select the toggle to apply the setting Restrict access to admins and managers to your new folder.
The new folder will appear within the selected folder.
Click the Sort button to change the sorting of files in folders by Name, Modified, and Size and either Ascending or Descending.
You can view your folders and files either by list (the default) or icon using the relevant button beside the sort options.
Type your query into the search bar and all files/folders that match and are within the current selected folder will be filtered.
If you want to search all files within the project ensure that the top folder with your project name is selected when searching.
When right-clicking on a folder or file a menu will display with the relevant options for the selection.
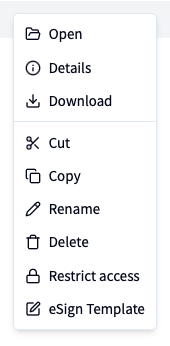
For example you can rename, cut, copy, delete, change the restrictions on folders and files, and create an eSign Template to send for e-signature.
These templates comprise of one or more documents which can be emailed for e-signature. Templates can be created:
From an existing document (PDF or DOCX) or image file using the context menu
By clicking eSign Templates and then clicking Create Template
By cloning an existing template from the list of eSign Templates (you can also clone from another project to the project you are currently working on)
The template editor allows you to:
Change the name of the template - click the text in the top left corner to edit
Add a Signature field, and other data collection fields - simply drag and drop them onto the document
Add multiple parties to collect signatures and other information
Add or remove documents
Send the template to each party to complete
The template list view allow you to manage your templates for the selected project. From the Actions menu for a template:
Edit/Send - opens the template editor
List submissions - view details of who has received a signing request
Clone (to current project) - creates a copy of the template in the current project
Delete - deletes the template and submission information (does not delete signed documents which have been saved to your files)
Once a document is signed, a copy of the document saved into Files in a folder called Signed Documents. This folder is restricted by default.
You can share individual files with project contacts or project team members. The share dialog has two tabs: Project Contacts and Project Team.
Right-click on a file in the file manager.
Select Share from the context menu.
Choose a tab:
Project Contacts — External contacts associated with the project. Only contacts with an email address are shown. Contacts who already have an active share for this file are excluded.
Project Team — Team members on the project, including account-level owners and admins.
Select one or more recipients from the list.
Set the Expiry Date and Protected sharing options (see below).
Click Share. Each selected recipient will receive an email.
Sharing requires edit permission on the file. The share option is only available for individual files, not folders.
How a team member receives the shared file depends on their project role:
Owner, Admin, Manager, Editor — These members already have access to files in the project. They receive an email with a direct link that opens the file in MotionHub. No download link, expiry date, or protected sharing settings are needed.
Commenter, Reader — These members do not have direct access to files. They receive a secure download link by email, the same as project contacts. The expiry date and protected sharing settings apply.
When only team members with file access (Owner, Admin, Manager, Editor) are selected, the expiry date and protected sharing controls are disabled since they are not applicable.
The share dialog includes a Protected sharing toggle, which is enabled by default.
Protected sharing on — The download link expires after one hour. If the recipient does not download the file in time, they can request a new link from the download page. New links can be requested until the expiry date passes. This is recommended for sensitive or confidential files.
Protected sharing off — The download link remains valid until the expiry date. The recipient can download the file at any time within the access window without needing to request a new link.
To manage existing shares, right-click the file and select Share. If the file already has active shares, a management dialog will open showing all current recipients.
From this dialog you can:
Add Share — Share the file with additional contacts or team members.
Resend — Re-send the download email to a recipient. Useful if the original email was lost or missed.
Revoke — Remove access for a specific recipient. Their download link will no longer work.
Revoke All — Remove access for all recipients at once. This option appears when there are two or more active shares.
When a recipient clicks the download link in their email, one of the following will happen:
Download starts — The file begins downloading automatically. A button is available to download again if needed.
Link expired — The download link has expired but the file is still accessible. The recipient can click Request New Link to receive a fresh download link by email. This only applies to shares with protected sharing enabled.
No longer available — The share has been revoked by the sender, the expiry date has passed, or the download limit has been reached. The recipient should contact the sender to request a new share.
Each share has a maximum number of downloads to prevent misuse if a link is forwarded to unintended recipients. Once the limit is reached, the download link will stop working and the recipient will see a message asking them to contact the sender.
If you need to allow further downloads, revoke the existing share and create a new one. The download count resets with each new share.
